It's really irritating sometimes when you can't view the thumbnails for your Flv files. So now here's this little trick you can play with your registry which will enable you to view thumbnails for all the media files you want.
Okay, so now what you have to do is that you have to make REG files to edit the registry automatically. Here's what you have to do:
Open the notepad and paste the following editing keys for each file type:
For Flv
REGEDIT4
[HKEY_CLASSES_ROOT\.flv\ShellEx\{BB2E617C-0920-11d1-9A0B-00C04FC2D6C1}]
@="{c5a40261-cd64-4ccf-84cb-c394da41d590}"
For DAT
REGEDIT4
[HKEY_CLASSES_ROOT\.dat\ShellEx\{BB2E617C-0920-11d1-9A0B-00C04FC2D6C1}]
@="{c5a40261-cd64-4ccf-84cb-c394da41d590}"
For mp4
REGEDIT4
[HKEY_CLASSES_ROOT\.mp4\ShellEx\{BB2E617C-0920-11d1-9A0B-00C04FC2D6C1}]
@="{c5a40261-cd64-4ccf-84cb-c394da41d590}"
Okay, after pasting any of these in the notepad, save the file with any name with a .reg extension. A registry file will be created. Double click the registry file and you will be asked whether you want to add new information to the registry. Click yes and here you go. Now you can view the thumbnails for your selected file type. :):)
Note: Before playing with the registry, it is always recommended to create a system restore point.
Sunday, September 6, 2009
FIREFOX HACKS - 100% FASTER INTERNET!
Did you know that by editing some hidden Firefox settings you can customize it to your liking and make it work A LOT FASTER? Here's how!
1>>Just go to the address bar and type "about:config" without quotes.
2>>A page will appear warning you about the consequences of what might happen to your application if you do this. Click on "I'll be careful, I promise!"

3>>Now you have all the hidden settings of Firefox infront of you.

DON'T TOUCH ANYTHING HERE BECAUSE THIS MIGHT SERIOUSLY MESS THINGS UP!
Now we are going to tweak these settings to get more out of Firefox! Again, be very careful with everything.
MAKING FIREFOX FASTER
Okay, so now once you have the settings infront of you, go to the top where a bar is present with the label "Filter:".
2>>Search for the option 'network.http.max-connections-per-server' and double click on it and set the integer value to '50'.
3>>Now search for the option 'network.http.pipelining' and double click on it to set the boolean value to 'True'.
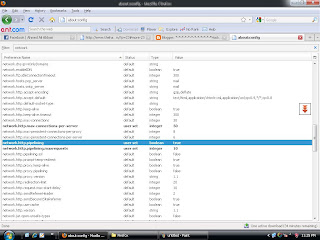
4>>Now locate the option 'network.http.pipelining.maxrequests' and set the integer value to '10'. Don't make it larger than 10 because you might get banned from some website!
5>>Browse the Internet and feel the DIFFERENCE! :D
1>>Just go to the address bar and type "about:config" without quotes.
2>>A page will appear warning you about the consequences of what might happen to your application if you do this. Click on "I'll be careful, I promise!"

3>>Now you have all the hidden settings of Firefox infront of you.

DON'T TOUCH ANYTHING HERE BECAUSE THIS MIGHT SERIOUSLY MESS THINGS UP!
Now we are going to tweak these settings to get more out of Firefox! Again, be very careful with everything.
MAKING FIREFOX FASTER
Okay, so now once you have the settings infront of you, go to the top where a bar is present with the label "Filter:".
1>>In this bar type 'network'. The very long list of options will get shortlisted to the only containing the word 'network'.
2>>Search for the option 'network.http.max-connections-per-server' and double click on it and set the integer value to '50'.
3>>Now search for the option 'network.http.pipelining' and double click on it to set the boolean value to 'True'.

4>>Now locate the option 'network.http.pipelining.maxrequests' and set the integer value to '10'. Don't make it larger than 10 because you might get banned from some website!
5>>Browse the Internet and feel the DIFFERENCE! :D

Get MORE From Your VGA Card - Hardware Hacking!
Overclocking is a complex procedure tailor made for computer enthusiasts who want more for less. It is a technique used to increase the speed of a particular component (VGA, RAM, Processors) beyond stock. Stock is the bunch of default settings that are programmed into the device at the time manufacturing. Overclocking is the alteration of the "stock" to achieve better performance.
Warning
If carried out properly, overclocking is a completely harmless procedure but overdoing may lead to permanent failure of the component due to excessive heating.
Overclocking may also void the warranty of your particular component.
Now after you've considered the pros and cons, let the game begin!
In this tutorial we'll only be overclocking your VGA card so that you can enjoy your favorite game with better graphics at a faster speed!
How to overclock your VGA?
There is plenty of software out there which can overclock your components for you. But I'll use be using Riva Tuner(2.24 c) for it can overclock both ATI and Nvidia cards.
1>>Download the software at (http://downloads.guru3d.com/download.php?det=163).
2.>>Extract it. Install it. After you have installed the software, you can chose whether to enable the first option(The virtual memory one) or not.
3>>Be patient as it generates a registry database.
4>>Down to business!
(a) Run Rivatuner.
(b) You will be greeted by a page composed of two sub-headings, Target Adapter(you will see the name of your vga along with other information),Driver settings.
(c) Scroll to driver settings. Her you will see a small,square tab with a right angle triangle on it(Customize).Click the tab. Six pop ups ought to appear.Click the First starting from the left(System Settings). A page will open in a different window.
(d) At the top of the page you'll see a check box followed by an Enable Driver level-hardware overclocking. Check It. A new window will pop up. Asking you to reboot,detect now or.....Click 'Detect Now' and another option to the right of the "enable driver level hardware clocking" will appear. It is currently at "Performance 2D" or whatever. Open the Drop menu and choose "performance 3d".
IMPORTANT
When you start using demanding 3d applications (e.g.: games). Make sure that the "Apply overclocking at windows startup..." is checked.
(e) You can overclock it by sliding the sliders(both of them) to the right.
(f) Slide the first core clock slider to the extreme right(IF YOU REALLY WANT A BIG BOOST). IMPORTANT: Do not Do THE SAME With the memory clock, whatever the situation may be.
(g) When you start using demanding 3d applications (e.g.: games). Make sure that the "Apply overclocking at windows startup..." is checked.
(h) Check the "apply settings at startup".
(i) Now click Apply and then OK at the bottom of the screen.
You're done. Enjoy! But be careful!
COOLING YOUR COMPONENT SIMULTANEOUSLY WHILE OVERCLOCKING IS VERY IMPORTANT -
Warning
If carried out properly, overclocking is a completely harmless procedure but overdoing may lead to permanent failure of the component due to excessive heating.
Overclocking may also void the warranty of your particular component.
Now after you've considered the pros and cons, let the game begin!
In this tutorial we'll only be overclocking your VGA card so that you can enjoy your favorite game with better graphics at a faster speed!
How to overclock your VGA?
There is plenty of software out there which can overclock your components for you. But I'll use be using Riva Tuner(2.24 c) for it can overclock both ATI and Nvidia cards.
1>>Download the software at (http://downloads.guru3d.com/download.php?det=163).
2.>>Extract it. Install it. After you have installed the software, you can chose whether to enable the first option(The virtual memory one) or not.
3>>Be patient as it generates a registry database.
4>>Down to business!
(a) Run Rivatuner.
(b) You will be greeted by a page composed of two sub-headings, Target Adapter(you will see the name of your vga along with other information),Driver settings.
(c) Scroll to driver settings. Her you will see a small,square tab with a right angle triangle on it(Customize).Click the tab. Six pop ups ought to appear.Click the First starting from the left(System Settings). A page will open in a different window.
(d) At the top of the page you'll see a check box followed by an Enable Driver level-hardware overclocking. Check It. A new window will pop up. Asking you to reboot,detect now or.....Click 'Detect Now' and another option to the right of the "enable driver level hardware clocking" will appear. It is currently at "Performance 2D" or whatever. Open the Drop menu and choose "performance 3d".
IMPORTANT
When you start using demanding 3d applications (e.g.: games). Make sure that the "Apply overclocking at windows startup..." is checked.
(e) You can overclock it by sliding the sliders(both of them) to the right.
(f) Slide the first core clock slider to the extreme right(IF YOU REALLY WANT A BIG BOOST). IMPORTANT: Do not Do THE SAME With the memory clock, whatever the situation may be.
(g) When you start using demanding 3d applications (e.g.: games). Make sure that the "Apply overclocking at windows startup..." is checked.
(h) Check the "apply settings at startup".
(i) Now click Apply and then OK at the bottom of the screen.
You're done. Enjoy! But be careful!
COOLING YOUR COMPONENT SIMULTANEOUSLY WHILE OVERCLOCKING IS VERY IMPORTANT -
Cooling a particular component - Hardware Hacking!
In order to gather information about your computer's temperature and other heating issues which may be caused by overclocking, we need to download this simple but immensely useful utility Everest. You can download it here >> (http://majorgeeks.com/download.php?det=4181).
USING THE EVEREST!
(a) Run Everest
(b) Click on the "sensor" option in main menu.
(c) Here you will get to know your temeperatures.
(d) Note: GPU temperatures are considered NORMAL in the range from 30-60 degrees at Idle and around 70-85 degrees while using heavy graphics applications.
Good Old Methods
(a) Remove the casing or the sides of your PC by just loosening a few easy bolts.This reduces the temperatures by an approximate 15Degrees.Keep your PC Clean And WELL VENTILATED.
(b) Better air flow by re arranging the wires and renovating the jumbled ones.
(c) Try to avoid keeping your pc in cornering areas.
(d) Make sure that the PC is ATLEAST 3 feet away from any type of a wall.
(e) Clean your PC gently and regularly with a brush.
Okay, so now let us talk about software which can be used to cool down your CPU components. There are two good applications which can do it for you. They are:
1>>SPEEDFAN
2>>CPU COOL.
I prefer SpeedFan because it uses lesser resources and doesn't make your system very noisy. Just download it from (http://www.almico.com/speedfan.php) and run it. It is very user friendly and you can easily manipulate and control the fan speed according to the temperature of your components. :)
USING THE EVEREST!
(a) Run Everest
(b) Click on the "sensor" option in main menu.
(c) Here you will get to know your temeperatures.
(d) Note: GPU temperatures are considered NORMAL in the range from 30-60 degrees at Idle and around 70-85 degrees while using heavy graphics applications.
Good Old Methods
(a) Remove the casing or the sides of your PC by just loosening a few easy bolts.This reduces the temperatures by an approximate 15Degrees.Keep your PC Clean And WELL VENTILATED.
(b) Better air flow by re arranging the wires and renovating the jumbled ones.
(c) Try to avoid keeping your pc in cornering areas.
(d) Make sure that the PC is ATLEAST 3 feet away from any type of a wall.
(e) Clean your PC gently and regularly with a brush.
Okay, so now let us talk about software which can be used to cool down your CPU components. There are two good applications which can do it for you. They are:
1>>SPEEDFAN
2>>CPU COOL.
I prefer SpeedFan because it uses lesser resources and doesn't make your system very noisy. Just download it from (http://www.almico.com/speedfan.php) and run it. It is very user friendly and you can easily manipulate and control the fan speed according to the temperature of your components. :)
3D Analyze - Play Latest Games on the SAME OLD MACHINE!!
So you want to play the latest games but can't because you're VGA card is not really up to task. That's where utilities such as 3D Analyze come into play. 3D Analyze is a utility that tweaks certain features of a GPU to increase the performance by as much as 50%!
Solving the notorious "Pixel Shader Problems"
Beginning the Procedure
1>>Download 3D Analyze from (http://software.emule.com/3d-analyze-2-36/).
2>>IMPORTANT: Be sure to extract it in your WINDOWS folder.
3>>To begin browse to the folder where you extracted the 3D Analyze. Double click the icon.
4>>Now a new screen pops up.
IMPORTANT:You may want to experiment with the settings.The settings provided below are the settings that will adjust to most of the games.
Enable the:
1>>"emulate HW Tnl caps".
2>>"emulate other DX8.1 caps".
3>>"emulate pixel shader caps".
4>>"force high percision pixel shader".
5>>Now click "RUN".
6>>Run the game!!
It would be highly appreciated if all of you keep on modifying the settings and provide positive feedback.
Solving the notorious "Pixel Shader Problems"
Beginning the Procedure
1>>Download 3D Analyze from (http://software.emule.com/3d-analyze-2-36/).
2>>IMPORTANT: Be sure to extract it in your WINDOWS folder.
3>>To begin browse to the folder where you extracted the 3D Analyze. Double click the icon.
4>>Now a new screen pops up.
IMPORTANT:You may want to experiment with the settings.The settings provided below are the settings that will adjust to most of the games.
Enable the:
1>>"emulate HW Tnl caps".
2>>"emulate other DX8.1 caps".
3>>"emulate pixel shader caps".
4>>"force high percision pixel shader".
5>>Now click "RUN".
6>>Run the game!!
It would be highly appreciated if all of you keep on modifying the settings and provide positive feedback.
Subscribe to:
Posts (Atom)