Hi guys. First of all, I want to say that I didn't make this tutorial myself, I found it on Hacking Library
If it's not authorized to post this kinda tutorials here, or if it has already been post, then I'm sorry to say useless things : )
the tutorial looks like that :
Introduction
1. Welcome to the basic NETBIOS document created by aCId_rAIn. This document will teach you some simple things about NETBIOS, what it does, how to use it, how to hack with it, and some other simple DOS commands that will be useful to you in the future. THIS DOCUMENT IS FOR NEWBIEZ ONLY!!! If you are NOT a newbie then don't go any farther reading this because if you're smart enough you probably already know it all. So don't waste yourt time reading something that you already know.
Saturday, November 7, 2009
Saturday, September 19, 2009
●๋• Orkut Html Codes ●๋•█▐║│▌│█▐║│
Center
.For Posting in centre...
<CENTER>Write ur Text Here</CENTER>
HYPERLINK
<A HREF="Link Of THe site ,etc">TEXT</A>
Here , Replace "TEXT" with a word of ur choice..
And replace "Link Of THe site ,etc" with the link of ur choice....
Then The given word will act as ur link....
Here , Replace "TEXT" with a word of ur choice..
And replace "Link Of THe site ,etc" with the link of ur choice....
Then The given word will act as ur link....
.
Font Editing - part 1
<FONT FACE="Times New Roman" SIZE="4">"Your Text"</FONT>
Here U Can Replace "Times New Roman" with any other font ...and "4" with any other size...
And Write the scrap by replacing "Your Text" ...
Here U Can Replace "Times New Roman" with any other font ...and "4" with any other size...
And Write the scrap by replacing "Your Text" ...
.
Font Editing - part 2
<FONT FACE="Times New Roman" SIZE="+3" COLOR="#FF0000">"Your Text"</FONT>
Same as above ....only here u can give colour ..
To Give Color Replace #FF0000 with any other possible code...
For eg #FF0000 represents RED
For Other Colur codes click below...
http://www.gotomy.com/color.html
Same as above ....only here u can give colour ..
To Give Color Replace #FF0000 with any other possible code...
For eg #FF0000 represents RED
For Other Colur codes click below...
http://www.gotomy.com/color.html
.
Horizontal line..
<HR WIDTH="75%" COLOR="#FF0000" SIZE="4">
This Code Is Used To Create A Horizontal Line....
Just Like Other Codes Replace "75%" , "#FF0000" and "4" To ur Choice...
This Code Is Used To Create A Horizontal Line....
Just Like Other Codes Replace "75%" , "#FF0000" and "4" To ur Choice...
.
IMAGES with links
IMAGES with links
<center><img src="LINK Of THE IMAGE" border=0></a><br><a href="LINK OF UR CHOICE" target="_blank">"TEXT OF UR CHOICE" </a></center>
Here The image acts as ur reqd. link....
Replace "LINK Of THE IMAGE" with ur image's link
Replace "LINK OF UR CHOICE" with the link u want to link with the image..
Replace "TEXT OF UR CHOICE" with urs, For Eg- Click On the Pic etc..
,
HTML CODES __ FOR FUN...
Some Ready Codes Only For u ...
● Just Copy Paste in ur Scrapbook and enjoy...
Butterflies In ScrapBook
<embed allowScriptAccess="never" allowNetworking="internal" enableJavaScript="false" src="http://www.crazyprofile.com/butter
᠌
Einstein's Quotes(The Best)
<object classid="clsid:D27CDB6E-AE6D-11cf-96B8-4
<param name="movie" value="http://www.crazyprofile.com/widg
<param name="wmode" value="transparent" />
<embed src="http://www.crazyprofile.com/widget
</object><br><div>
.
Sunday, September 13, 2009
CHROME OS
Chrome os...!!
Google CHROME OS v2.00 beta
Download Google CHROME OS v2.00 beta at High Speed
Google CHROME OS v2.00 beta | 536 MB
Google Chrome has always been a little more than a browser: it's optimized for running web applications, each tab runs as a separate process, the interface is minimalistic and there's even a task manager. "We realized that the web had evolved from mainly simple text pages to rich, interactive applications and that we needed to completely rethink the browser. What we really needed was not just a browser, but also a modern platform for web pages and applications, and that's what we set out to build," said Google in September 2008.
Google's blog announces a natural extension of the Chrome project: an operating system for netbooks. "Google Chrome OS is an open source, lightweight operating system that will initially be targeted at netbooks. Later this year we will open-source its code, and netbooks running Google Chrome OS will be available for consumers in the second half of 2010. (...) Google Chrome OS will run on both x86 as well as ARM chips and we are working with multiple OEMs to bring a number of netbooks to market next year. The software architecture is simple — Google Chrome running within a new windowing system on top of a Linux kernel."
As people use more and more web applications, the operating system becomes less important and it makes no sense to pay for it. The desktop mail client could be replaced by Gmail, the calendaring application could be replaced by Google Calendar, the office suite has lightweight alternatives: Google Docs and Zoho, it makes more sense to use an online feed reader like Google Reader, your scientific calculator is less powerful than Wolfram Alpha and you'll rarely need a video player when you have YouTube, Hulu and other video sites.
This idea is not new and there are already operating systems optimized for the browser. For example, Good OS announced last year Cloud, an operating system that "integrates a web browser with a compressed Linux operating system kernel for immediate access to Internet, integration of browser and rich client applications, and full control of the computer from inside the browser". If Google manages to create a great user interface, the new operating system could be very successful.
This paragraph from Google’s announcement helps clarify what Google is building into this operating system:
“Speed, simplicity and security are the key aspects of Google Chrome OS. We’re designing the OS to be fast and lightweight, to start up and get you onto the web in a few seconds. The user interface is minimal to stay out of your way, and most of the user experience takes place on the web. And as we did for the Google Chrome browser, we are going back to the basics and completely redesigning the underlying security architecture of the OS so that users don’t have to deal with viruses, malware and security updates. It should just work.”
Screen shots here:


Links:
Uploading:
http://uploading.com/files/SXW6SPWI/CWG0SC2B1_www.softarchive.net.part1.rar.html
.
http://uploading.com/files/OZYY36GY/CWG0SC2B1_www.softarchive.net.part2.rar.html
.
http://uploading.com/files/4SALKIY8/CWG0SC2B1_www.softarchive.net.part3.rar.html
.
http://uploading.com/files/C10CJPAN/CWG0SC2B1_www.softarchive.net.part4.rar.html
.
http://uploading.com/files/MA4K34W8/CWG0SC2B1_www.softarchive.net.part5.rar.html
.
http://uploading.com/files/EKUMZ3GT/CWG0SC2B1_www.softarchive.net.part6.rar.html
Rapid Share:
http://rapidshare.com/files/259364998/CWG0SC2B1_www.softarchive.net.part1.rar.html
.
http://rapidshare.com/files/259365020/CWG0SC2B1_www.softarchive.net.part2.rar.html
.
http://rapidshare.com/files/259365039/CWG0SC2B1_www.softarchive.net.part3.rar.html
.
http://rapidshare.com/files/259365063/CWG0SC2B1_www.softarchive.net.part4.rar.html
.
http://rapidshare.com/files/259365095/CWG0SC2B1_www.softarchive.net.part5.rar.html
.
http://rapidshare.com/files/259364988/CWG0SC2B1_www.softarchive.net.part6.rar.html
Note:
We are just providing this for educational purpose.Downloading chrome may be an illegal work.
Google CHROME OS v2.00 beta
Download Google CHROME OS v2.00 beta at High Speed
Google CHROME OS v2.00 beta | 536 MB
Google Chrome has always been a little more than a browser: it's optimized for running web applications, each tab runs as a separate process, the interface is minimalistic and there's even a task manager. "We realized that the web had evolved from mainly simple text pages to rich, interactive applications and that we needed to completely rethink the browser. What we really needed was not just a browser, but also a modern platform for web pages and applications, and that's what we set out to build," said Google in September 2008.
Google's blog announces a natural extension of the Chrome project: an operating system for netbooks. "Google Chrome OS is an open source, lightweight operating system that will initially be targeted at netbooks. Later this year we will open-source its code, and netbooks running Google Chrome OS will be available for consumers in the second half of 2010. (...) Google Chrome OS will run on both x86 as well as ARM chips and we are working with multiple OEMs to bring a number of netbooks to market next year. The software architecture is simple — Google Chrome running within a new windowing system on top of a Linux kernel."
As people use more and more web applications, the operating system becomes less important and it makes no sense to pay for it. The desktop mail client could be replaced by Gmail, the calendaring application could be replaced by Google Calendar, the office suite has lightweight alternatives: Google Docs and Zoho, it makes more sense to use an online feed reader like Google Reader, your scientific calculator is less powerful than Wolfram Alpha and you'll rarely need a video player when you have YouTube, Hulu and other video sites.
This idea is not new and there are already operating systems optimized for the browser. For example, Good OS announced last year Cloud, an operating system that "integrates a web browser with a compressed Linux operating system kernel for immediate access to Internet, integration of browser and rich client applications, and full control of the computer from inside the browser". If Google manages to create a great user interface, the new operating system could be very successful.
This paragraph from Google’s announcement helps clarify what Google is building into this operating system:
“Speed, simplicity and security are the key aspects of Google Chrome OS. We’re designing the OS to be fast and lightweight, to start up and get you onto the web in a few seconds. The user interface is minimal to stay out of your way, and most of the user experience takes place on the web. And as we did for the Google Chrome browser, we are going back to the basics and completely redesigning the underlying security architecture of the OS so that users don’t have to deal with viruses, malware and security updates. It should just work.”
Screen shots here:
Links:
Uploading:
http://uploading.com/files/SXW6SPW
.
http://uploading.com/files/OZYY36
.
http://uploading.com/files/4SALK
.
http://uploading.com/files/C10C
.
http://uploading.com/files/MA4
.
http://uploading.com/files/EK
Rapid Share:
http://rapidshare.com/files/259364
.
http://rapidshare.com/files/259
.
http://rapidshare.com/files/
.
http://rapidshare.com/fil
.
http://rapidshare.com/
.
http://rapidshare.c
Note:
We are just providing this for educational purpose.Downloading chrome may be an illegal work.
Sunday, September 6, 2009
New orkut Bug...

Just listen....
This was a bug.....
Just type
the above....
Which is written in picture in the first line of the now topic while creating it..........
And then type the text from the second line......
Now see the MAGIC.....
View Flv, Mp4, 3gp and Mov thumbnails in Windows Explorer!
It's really irritating sometimes when you can't view the thumbnails for your Flv files. So now here's this little trick you can play with your registry which will enable you to view thumbnails for all the media files you want.
Okay, so now what you have to do is that you have to make REG files to edit the registry automatically. Here's what you have to do:
Open the notepad and paste the following editing keys for each file type:
For Flv
REGEDIT4
[HKEY_CLASSES_ROOT\.flv\ShellEx\{BB2E617C-0920-11d1-9A0B-00C04FC2D6C1}]
@="{c5a40261-cd64-4ccf-84cb-c394da41d590}"
For DAT
REGEDIT4
[HKEY_CLASSES_ROOT\.dat\ShellEx\{BB2E617C-0920-11d1-9A0B-00C04FC2D6C1}]
@="{c5a40261-cd64-4ccf-84cb-c394da41d590}"
For mp4
REGEDIT4
[HKEY_CLASSES_ROOT\.mp4\ShellEx\{BB2E617C-0920-11d1-9A0B-00C04FC2D6C1}]
@="{c5a40261-cd64-4ccf-84cb-c394da41d590}"
Okay, after pasting any of these in the notepad, save the file with any name with a .reg extension. A registry file will be created. Double click the registry file and you will be asked whether you want to add new information to the registry. Click yes and here you go. Now you can view the thumbnails for your selected file type. :):)
Note: Before playing with the registry, it is always recommended to create a system restore point.
FIREFOX HACKS - 100% FASTER INTERNET!
Did you know that by editing some hidden Firefox settings you can customize it to your liking and make it work A LOT FASTER? Here's how!
1>>Just go to the address bar and type "about:config" without quotes.
2>>A page will appear warning you about the consequences of what might happen to your application if you do this. Click on "I'll be careful, I promise!"

3>>Now you have all the hidden settings of Firefox infront of you.

DON'T TOUCH ANYTHING HERE BECAUSE THIS MIGHT SERIOUSLY MESS THINGS UP!
Now we are going to tweak these settings to get more out of Firefox! Again, be very careful with everything.
MAKING FIREFOX FASTER
Okay, so now once you have the settings infront of you, go to the top where a bar is present with the label "Filter:".
2>>Search for the option 'network.http.max-connections-per-server' and double click on it and set the integer value to '50'.
3>>Now search for the option 'network.http.pipelining' and double click on it to set the boolean value to 'True'.
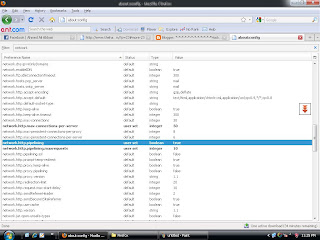
4>>Now locate the option 'network.http.pipelining.maxrequests' and set the integer value to '10'. Don't make it larger than 10 because you might get banned from some website!
5>>Browse the Internet and feel the DIFFERENCE! :D
1>>Just go to the address bar and type "about:config" without quotes.
2>>A page will appear warning you about the consequences of what might happen to your application if you do this. Click on "I'll be careful, I promise!"

3>>Now you have all the hidden settings of Firefox infront of you.

DON'T TOUCH ANYTHING HERE BECAUSE THIS MIGHT SERIOUSLY MESS THINGS UP!
Now we are going to tweak these settings to get more out of Firefox! Again, be very careful with everything.
MAKING FIREFOX FASTER
Okay, so now once you have the settings infront of you, go to the top where a bar is present with the label "Filter:".
1>>In this bar type 'network'. The very long list of options will get shortlisted to the only containing the word 'network'.
2>>Search for the option 'network.http.max-connections-per-server' and double click on it and set the integer value to '50'.
3>>Now search for the option 'network.http.pipelining' and double click on it to set the boolean value to 'True'.

4>>Now locate the option 'network.http.pipelining.maxrequests' and set the integer value to '10'. Don't make it larger than 10 because you might get banned from some website!
5>>Browse the Internet and feel the DIFFERENCE! :D
Get MORE From Your VGA Card - Hardware Hacking!
Overclocking is a complex procedure tailor made for computer enthusiasts who want more for less. It is a technique used to increase the speed of a particular component (VGA, RAM, Processors) beyond stock. Stock is the bunch of default settings that are programmed into the device at the time manufacturing. Overclocking is the alteration of the "stock" to achieve better performance.
Warning
If carried out properly, overclocking is a completely harmless procedure but overdoing may lead to permanent failure of the component due to excessive heating.
Overclocking may also void the warranty of your particular component.
Now after you've considered the pros and cons, let the game begin!
In this tutorial we'll only be overclocking your VGA card so that you can enjoy your favorite game with better graphics at a faster speed!
How to overclock your VGA?
There is plenty of software out there which can overclock your components for you. But I'll use be using Riva Tuner(2.24 c) for it can overclock both ATI and Nvidia cards.
1>>Download the software at (http://downloads.guru3d.com/download.php?det=163).
2.>>Extract it. Install it. After you have installed the software, you can chose whether to enable the first option(The virtual memory one) or not.
3>>Be patient as it generates a registry database.
4>>Down to business!
(a) Run Rivatuner.
(b) You will be greeted by a page composed of two sub-headings, Target Adapter(you will see the name of your vga along with other information),Driver settings.
(c) Scroll to driver settings. Her you will see a small,square tab with a right angle triangle on it(Customize).Click the tab. Six pop ups ought to appear.Click the First starting from the left(System Settings). A page will open in a different window.
(d) At the top of the page you'll see a check box followed by an Enable Driver level-hardware overclocking. Check It. A new window will pop up. Asking you to reboot,detect now or.....Click 'Detect Now' and another option to the right of the "enable driver level hardware clocking" will appear. It is currently at "Performance 2D" or whatever. Open the Drop menu and choose "performance 3d".
IMPORTANT
When you start using demanding 3d applications (e.g.: games). Make sure that the "Apply overclocking at windows startup..." is checked.
(e) You can overclock it by sliding the sliders(both of them) to the right.
(f) Slide the first core clock slider to the extreme right(IF YOU REALLY WANT A BIG BOOST). IMPORTANT: Do not Do THE SAME With the memory clock, whatever the situation may be.
(g) When you start using demanding 3d applications (e.g.: games). Make sure that the "Apply overclocking at windows startup..." is checked.
(h) Check the "apply settings at startup".
(i) Now click Apply and then OK at the bottom of the screen.
You're done. Enjoy! But be careful!
COOLING YOUR COMPONENT SIMULTANEOUSLY WHILE OVERCLOCKING IS VERY IMPORTANT -
Cooling a particular component - Hardware Hacking!
In order to gather information about your computer's temperature and other heating issues which may be caused by overclocking, we need to download this simple but immensely useful utility Everest. You can download it here >> (http://majorgeeks.com/download.php?det=4181).
USING THE EVEREST!
(a) Run Everest
(b) Click on the "sensor" option in main menu.
(c) Here you will get to know your temeperatures.
(d) Note: GPU temperatures are considered NORMAL in the range from 30-60 degrees at Idle and around 70-85 degrees while using heavy graphics applications.
Good Old Methods
(a) Remove the casing or the sides of your PC by just loosening a few easy bolts.This reduces the temperatures by an approximate 15Degrees.Keep your PC Clean And WELL VENTILATED.
(b) Better air flow by re arranging the wires and renovating the jumbled ones.
(c) Try to avoid keeping your pc in cornering areas.
(d) Make sure that the PC is ATLEAST 3 feet away from any type of a wall.
(e) Clean your PC gently and regularly with a brush.
Okay, so now let us talk about software which can be used to cool down your CPU components. There are two good applications which can do it for you. They are:
1>>SPEEDFAN
2>>CPU COOL.
I prefer SpeedFan because it uses lesser resources and doesn't make your system very noisy. Just download it from (http://www.almico.com/speedfan.php) and run it. It is very user friendly and you can easily manipulate and control the fan speed according to the temperature of your components. :)
3D Analyze - Play Latest Games on the SAME OLD MACHINE!!
So you want to play the latest games but can't because you're VGA card is not really up to task. That's where utilities such as 3D Analyze come into play. 3D Analyze is a utility that tweaks certain features of a GPU to increase the performance by as much as 50%!
Solving the notorious "Pixel Shader Problems"
Beginning the Procedure
1>>Download 3D Analyze from (http://software.emule.com/3d-analyze-2-36/).
2>>IMPORTANT: Be sure to extract it in your WINDOWS folder.
3>>To begin browse to the folder where you extracted the 3D Analyze. Double click the icon.
4>>Now a new screen pops up.
IMPORTANT:You may want to experiment with the settings.The settings provided below are the settings that will adjust to most of the games.
Enable the:
1>>"emulate HW Tnl caps".
2>>"emulate other DX8.1 caps".
3>>"emulate pixel shader caps".
4>>"force high percision pixel shader".
5>>Now click "RUN".
6>>Run the game!!
It would be highly appreciated if all of you keep on modifying the settings and provide positive feedback.
Increase Virtual Memory - Maximize Performance
If your RAM isn't large enough to support some of the heavy graphical activity, there is a trick you can play to make up for this. Windows has an option which uses some space from your hardisk as your RAM and helps you inpushing the boundaries while working on your computer. Here's how you have to do it:
Increasing Virtual MEmory(To fasten up your 3d Applications).
1>>Right Click The Computer Icon.
2>>Click Properties.
3>>You'll see a few tabs.Click "Advanced".
4>>Now, Three more options, Click "Settings", Under The Performance option.
5>>Now, you'll see "Virtual Memory" at the bottom of the page.Here is the "Change" option.Click it.
6>>You'll see "Paging File Size fo selected drive".Under it are two more options "INITIAL SIZE", "MAXIMUM SIZE".
7>>IMPORTANT: If you have 512 MB Ram, Then multiply it by 1.5.Whatever PHYSICAL MEMORY you have, multiply it by 1.5.
8>>Now, The result you get after the calculation(For 512 MB, Allocate 768 MB in both the spaces.
9>>Click "SET".
10>>Click OK.
You've increased your Virtual Memory!
Note: Windows doesn't delete the temporary files it creates while using the Virtual Memory. So it's advised to regularly clean up these files it creates using a good trash cleaning utility such as CCleaner.
Rename Tabs - Firefox Hacks!
So you really don't want anyone else to know what you're upto on the Internet? Not even someone sitting right beside you? Now you can really do it. You can rename the tabs in Firefox so that they get falsely labeled. Check this out:
Before

After

This comes in very handy at times and is as simple as ABC to apply. You just have to have a simple Add-on which does it for you. It's called TabRenamizer and can be downloaded from HERE.
After installing it, you can rename Tabs by going to Tools>>Rename Tabs or Tools>>Rename Tabs(auto).
You can also give your tabs the name of your choice.
And if you don't get the time to go to tools, just press in "Ctrl+Shift+Z" and your tabs will get automatically renamed. See how close these keys are on the keyboard? :D
Have fun! ;)
How to get someone's IP address?
IP addresses are of prime significance in the understanding of the functionality of Internet. To skip the details and being simple, and IP address is a unique address assigned to any machine connected to the Internet. This signifies the fact that if you have the address of any machine, you are in a better position to commence the use of any feasible exploit, gain control over the machine and then use it to your advantage.
So, where do we begin from? First of all, you have to identify a particular target. It should be a person you happen to know personally. If the person is not in your close social circle, you will have to impersonate one of the victim's friend.
Now here is how the simple way stands:
1>>Add the victim on an IM.
2>>Tell them that you have this very important file eg. a picture of their's which you want to send using IM. If you say it the right way, there's no reason why the person would turn this down.
3>>Now before sending the file, open the command prompt in the background and type "netstat". It shows you all the open connections on your PC.
4>>Send the file and wait for the victim to accept it.
5>>As soon as the person accepts it and the file transfer begins, go to the command prompt and type "netstat" again without quotes. You will again see something like this:
Active Connections
TCP digital-venom:4046 80.252.110.146:4661 SYN_SENT
TCP digital-venom:4047 60.28.197.35:28221 SYN_SENT
TCP digital-venom:4048 219.239.90.172:28221 SYN_SENT
TCP digital-venom:4049 72.51.37.237:8899 SYN_SENT
TCP digital-venom:4050 66-199-250-170.reverse.ezzi.net:8911 SYN_SENT
Now compare this reading with the one you got before. The IP address newly added to the list is the IP address of your victim.
Note: Some third party software eg. Limewire is known to interfere with the connections established through an IM, specially MSN Messenger. Keep this in mind. :):)
Change Your IP Address!
Okay, this tutorial is going to teach you how to change your IP address which is visible to the websites and servers you connect to on the internet.
Okay, so what you have to do is this. [EXACTLY].
1>>Go to Run and open command prompt by typing 'cmd' and pressing enter.
2>>Now type 'ipconfig/release' without quotes.
3>>Now type 'exit' and leave the command prompt.
4>>Now go to Start>>Connect to>>Show all connections. This will open network connections.
5>>Right click the network adapter you use to connect to the internet and click properties.
6>>Double click on Internet Options(TCP/IP)
7>>Select Use the following IP address and enter any random address in the IP field.
8>>Subnet mask will automatically appear. Leave the 'Default gateway' field empty.
9>>Now click Ok, save the settings and exit. Wait for 60 seconds.
10>>Now again go to properties of the same adapter.
11>>Double click the TCP/IP option again and this time select 'Obtain an IP address automatically'.
12>>Click OK and exit.
13>>You have a new IP address.
Note: The above given method does not sometimes work when you're connecting to Internet through a router specially in some asian countries.
In case you're using a router and this doesn't work, just restart your router and you'll have a new IP address.
Subscribe to:
Comments (Atom)